I'm watching the weather channel and texting with my dear friend Jane in Shrewsbury, thinking about all of you in Massachusetts. I hope you are all safe and that these tornadoes stop soon. :( You are all in our thoughts.
-Tara & Jon

Wednesday, June 1, 2011

Tuesday, May 31, 2011
Creativity and you
I just read this fabulous post on comparing yourself to others, on tinybuddha.com. Well worth the read.
Monday, May 30, 2011
Quick projects and a gratuitous cat picture
I took a break from organizing my jewelry making supplies and made a quick bracelet today that I saw in a very expensive catalog a few years back. Of course, it is not the SAME bracelet, but the idea is the same: use a simple stringing material and a simple focal element to make a very delicate bracelet.

To make this bracelet, I used some 1 mm brown waxed cotton thread. You could use 1mm leather, or even crochet some thread into a thicker cord, but I think it is important for this bracelet to have a very lightweight, ethereal quality. SO, cut two equal lengths, planning that you will double each if you use the 1 mm cord. I'm gonna be my Grandma Ruthie here and when you ask, "But how much cord do I cut, Tara" and I'll say, "Enough." Just give yourself a good amount.
I chose the goldtone pewter rings from my show inventory- here is the silvertone version online on dollarbeads.net:
 But you could easily use any of these other focal rings- in fact, many of them will hold up to a thicker cord if you have it.
You could use this:
or this
 or I really like this:
 or even more on our website.
Ok, take each of the two pieces of cord, double them and then make a knot by placing the loop end of the cord through the center of the ring, then put the loose ends through the loop end and pull tight. Do this on each side. Then, you can use any kind of clasp. You could tie on jump rings and add toggles or lobster clasps, or hooks. I had a goldtone button which was very light, and so I placed one end of the bracelet through the shank and tied it. Then I made a simple loop on the other end by making two knots, with enough space in between for the button to pass through. Cut off the excess tails. Your bracelet is now ready to wear! UNLESS, like me, you made the hole between the two knots too large. Not to worry- slip a large hole pewtie over the knot. When you then place the button through the opening, the pewtie naturally falls close to the button and holds it closed.
Close up of the clasp with the pewter bead "slide" to hold it closed:

The bracelet is not as tight as it looks in the photo.Balancing my wrist on the edge of the couch while not showing the mess in my living room is virtually impossible Using my expert camera skills, I cleverly tightened the bracelet so the focal bead stayed centered during the shot.
And now, the aforementioned cat picture, which shows a quickie ring I made using a magnesite flower bead. Just cut a length of dead soft wire (mine was plastic coated) and thread it through the holes drilled in the bead from inside to out, on each side, and do a simple wrap around the wire.

I hope you enjoyed these quick projects.

To make this bracelet, I used some 1 mm brown waxed cotton thread. You could use 1mm leather, or even crochet some thread into a thicker cord, but I think it is important for this bracelet to have a very lightweight, ethereal quality. SO, cut two equal lengths, planning that you will double each if you use the 1 mm cord. I'm gonna be my Grandma Ruthie here and when you ask, "But how much cord do I cut, Tara" and I'll say, "Enough." Just give yourself a good amount.
I chose the goldtone pewter rings from my show inventory- here is the silvertone version online on dollarbeads.net:

You could use this:

or this


Ok, take each of the two pieces of cord, double them and then make a knot by placing the loop end of the cord through the center of the ring, then put the loose ends through the loop end and pull tight. Do this on each side. Then, you can use any kind of clasp. You could tie on jump rings and add toggles or lobster clasps, or hooks. I had a goldtone button which was very light, and so I placed one end of the bracelet through the shank and tied it. Then I made a simple loop on the other end by making two knots, with enough space in between for the button to pass through. Cut off the excess tails. Your bracelet is now ready to wear! UNLESS, like me, you made the hole between the two knots too large. Not to worry- slip a large hole pewtie over the knot. When you then place the button through the opening, the pewtie naturally falls close to the button and holds it closed.
Close up of the clasp with the pewter bead "slide" to hold it closed:

The bracelet is not as tight as it looks in the photo.
And now, the aforementioned cat picture, which shows a quickie ring I made using a magnesite flower bead. Just cut a length of dead soft wire (mine was plastic coated) and thread it through the holes drilled in the bead from inside to out, on each side, and do a simple wrap around the wire.

I hope you enjoyed these quick projects.
Sunday, May 29, 2011
Promises Promises
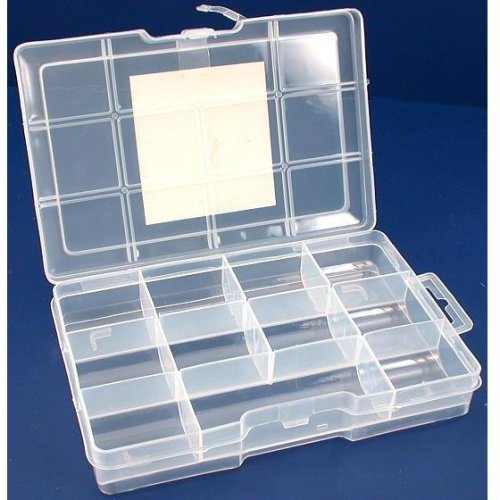
Ah, the weekend. Big plans are made during the week, with a hopeful optimism for accomplishing those things that, by simply being "weekendly", are highly valued. I did accomplish quite a bit this weekend, including buying new bead organization containers. But when I sat down at my coffee table beading table, all I could do was sort, sort, sort! But, which is the best way to sort? One tray of metal, one of stone, one of glass/resin? Or, all stringing materials together, all beads, and all findings? And all this kept me from creating. So, in lieu of a project, I'll present you with what I bought for organization.
At Joann Fabrics, these are on clearance:
 They are also selling divider trays that go inside. I cannot find a picture, but they are clear plastic trays, with three medium sized compartments on each side, and a long compartment in the middle, suitable for chain, or for strands of stone or pearl.
At Big Lots, I purchased four bins similar to these:
 What I like about these are the grooved lids and the fixed dividers. I have upteen million clear plastic containers with the moveable dividers and the beads always end up all over the place. The boxes from Big Lots have handles as well.
I purchased an old type tray as well. That is for my dream studio which, knock on wood, should materialize in the next year. It is a beautiful wood with many different sized containers. It is similar to this, although mine is smaller.

What did you do to pass the holiday weekend? And how do you store/organize your beads?
At Joann Fabrics, these are on clearance:

At Big Lots, I purchased four bins similar to these:
I purchased an old type tray as well. That is for my dream studio which, knock on wood, should materialize in the next year. It is a beautiful wood with many different sized containers. It is similar to this, although mine is smaller.

What did you do to pass the holiday weekend? And how do you store/organize your beads?
Wednesday, May 25, 2011
Hi!
Sorry I am late posting this week, I took a detour on the way home from the Mansfield, MA show and am now just catching up. I met some fine folks there- some I met at Marlboro. And I met one of my blog followers (*waves madly!*) which was awesome as always.
For those of you down Maryland way, we'll be at the Northeast Bead Extravaganza in Severna Park this weekend. Come on out and see us!
This weekend I'll be posting another project tutorial. We're working on a giveaway and some other neat things so stay tuned!
For those of you down Maryland way, we'll be at the Northeast Bead Extravaganza in Severna Park this weekend. Come on out and see us!
This weekend I'll be posting another project tutorial. We're working on a giveaway and some other neat things so stay tuned!
Wednesday, May 18, 2011
Website Special!
May Pearls - 10% Off Freshwater Pearls
Perfect for Weddings, Spring or Summer social events! Pearl mixes, faceted, coin, keshi, potato, rice, stick, tip drill, mabe and every color of the rainbow!
(*This does not include our pearls in our Talisman Discount or Dollar Beads sections.)
Time is running out- stock up on pretty pearls before the month is out!
Perfect for Weddings, Spring or Summer social events! Pearl mixes, faceted, coin, keshi, potato, rice, stick, tip drill, mabe and every color of the rainbow!
(*This does not include our pearls in our Talisman Discount or Dollar Beads sections.)
Time is running out- stock up on pretty pearls before the month is out!
Shows coming up this weekend!
Luann will be at the Bead Mercantile on Saturday and Sunday in Williamsburgh, VA. Click here for details.
Yours truly will be in Mansfield, MA on Sunday at the Divine Bead Festival click here for details.
We look forward to seeing you there!
Yours truly will be in Mansfield, MA on Sunday at the Divine Bead Festival click here for details.
We look forward to seeing you there!
Subscribe to:
Posts (Atom)